SMART SOLUTIONS · WEEK 5
Laser Cutting | Facilitator Guide
Students learn how cut, score, and engrave operations come from a file, then solve a small identification problem with a laser-ready tag.
Instructional Alignment
Topic: Fabrication-file design
Student objective: Students will Design and revise a laser-ready identity tag for a real use
- §126.19(c)(3)(B) — discuss and implement a design process that includes planning, selecting digital tools to develop, test, and evaluate design limitations, and refining a prototype or model; and
- §126.19(c)(12)(B) — implement effective file management strategies independently, including file naming conventions, local and remote locations, backup, hierarchy, folder structure, file conversion, tags, and emerging digital organizational strategies;
- §126.19(c)(12)(C) — select and use appropriate platform and tools, including selecting and using software or hardware to transfer data;
Demonstration of learning: teacher-checked file, cut result, revision, and reflection.
Alignment status: D
Core route: five class periods. The whole-group deck teaches each concept and provides a daily leave-up screen. Canvas holds the accessible directions, absence route, submission requirements, and rubric.
Download the Cut, Score, Engrave SVG
First Look 5 points · Identity Tag 100 points · Xello 5 points.
What makes this a design project
A student or classroom needs to identify, return, or sort an item.
The tag cannot expose a full legal name, student ID, phone number, or private account information.
2 to 3 inches, one closed cut silhouette, readable surface information, and a file that survives a real-size test.
Five-day run sheet
| Day | Teach | Students do | Deck |
|---|---|---|---|
| 1 | Pixels vs. paths; cut, score, engrave; room and material safety. | Inspect a physical sample or sourced photo and complete the First Look worksheet. | Slides 1–11. Leave slide 11 up. |
| 2 | Define the identification need. Model privacy-safe information, three thumbnails, and laser-ready geometry. | Choose an item and user, sketch three ideas, build the first vector file, and submit it for a file check. | Slides 12–18. Leave slide 18 up. |
| 3 | Real-size testing, partner trace, purpose check, and revision. | Test the tag at real size, find one problem, revise, and resubmit. | Slides 19–21. Leave slide 21 up. |
| 4 | Run the trained-operator machine queue and model safe finishing. | Finish, photograph, and document the revision while waiting. | Slides 22–23. Leave slide 23 up. |
| 5 | Critique purpose, privacy, and fabrication decisions separately. | Submit evidence, reflect, and connect one Matchmaker career result to fabrication work. | Slides 24–27. Leave slide 26 up during submission. |
Before students arrive
- Make physical evidence available. Cut the sample tile SVG from your approved classroom material, or prepare several existing objects that clearly show cut, score, and engrave. Number the samples so pairs can record which one they inspected.
- Print the worksheet. One per student is easiest. The editable Word version is available if your class completes it digitally.
- Test your exact machine route. Import the sample, assign operations, run one piece, and confirm that the score and engrave remain visibly different.
- Prepare the queue. Create one folder by class period. Use Period-Lastname-Firstname-FindableTag.svg.
- Prepare low-cost testing. Students need a real-size print, trace, or paper cutout before their file enters the machine queue.
- Set up work stations. Students should have meaningful test, revision, finishing, photo, and Xello work while the trained operator runs the machine.
Trained operator boundary
Use only documented laser-compatible material approved for the exact machine. Follow the manufacturer’s current manual, ventilation or filtration requirements, supervision rules, fire response procedure, and required training. Students do not change settings, bypass an enclosure or interlock, load unknown material, or start a job unless your local safety procedure explicitly allows trained student operators.
Common concepts, different software
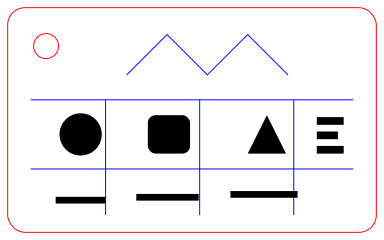
Teach the physical result first: a through-cut, a thin surface line, and a filled surface area. Then show how your classroom software assigns those results.
- Upload SVG or PDF for vector cut and engrave information.
- Strokes import as cuts; the operator can change a stroke to score.
- Filled vector areas and raster images engrave.
- JPG and PNG are engraving-only routes.
- Import the SVG and select the vector elements.
- Convert the identifier text to paths or outlines before export. XCS does not display live text inside an SVG.
- Assign an outline path to Cut or Score.
- Assign a filled vector area or raster image to Engrave.
- Use SVG for this project. PDF is not an xTool Creative Space import route.
- Use the safety training and settings for your exact xTool model.
xTool file and text guidance · xTool Cut, Score, and Engrave comparison · xTool safety training
First Look routine
- Show the sourced three-heart comparison so students can see one operation at a time.
- Give each pair a physical sample. Do not name its operations yet.
- Students sketch, mark Found or Not used, and cite visible evidence on the worksheet.
- Pairs compare answers. Reveal the operation map or sample file only after they commit to evidence.
- Collect the worksheet scan or photo plus the sentence: The laser used ______ to ______. I know because ______.
Day 2 model
The Gulf Coast Marine Rescue image shows how one visual identity can move onto a small object. It is not the student brief. Model the actual brief aloud: choose an item, name the user, protect private information, sketch three silhouettes, then choose the idea that stays readable and structurally strong.
Critique stem: I think this tag is for ______ because I notice ______.
Word bank: identify · return · sort · purpose · privacy · silhouette · readable · closed path · cut · score · engrave
Queue plan
- Students submit only after the Day 3 real-size and partner checks.
- The trained operator confirms material, size, placement, cut/score/engrave assignments, and ventilation or filtration.
- Students wait at the finishing, documentation, or revision station, not around the machine.
- If a file fails, return it with one specific note. The student revises before rejoining the queue.
Exact project rubric
- Purpose and privacy: 20
- Laser-ready geometry and file: 25
- Cut, score, and engrave plan: 20
- Testing and revision: 20
- Documentation and reflection: 15
Xello on Day 5
Students who completed Matchmaker in Week 1 reopen their results, choose one related career, and explain which part of the week’s work connects to it. Students who missed Matchmaker finish it first.
Optional extended challenge
A Taste of Texas remains available as a longer competition or CTSO route. It asks for three logo applications and a full visual portfolio, so it is not the default five-day project. Use it only when your calendar and machine queue can support it.
Download the complete A Taste of Texas challenge · Make a Google copy.